SPL

SPL is short for Sound Pressure Level. SPL is the local deviation in pressure from the ambient atmospheric pressure caused by sound waves.
Basic Terminology
So far we have learned that SPL is short for sound pressure level. But there are a few more we need to know before we can get started.
dB – Decibel, reference scale for the human ear.
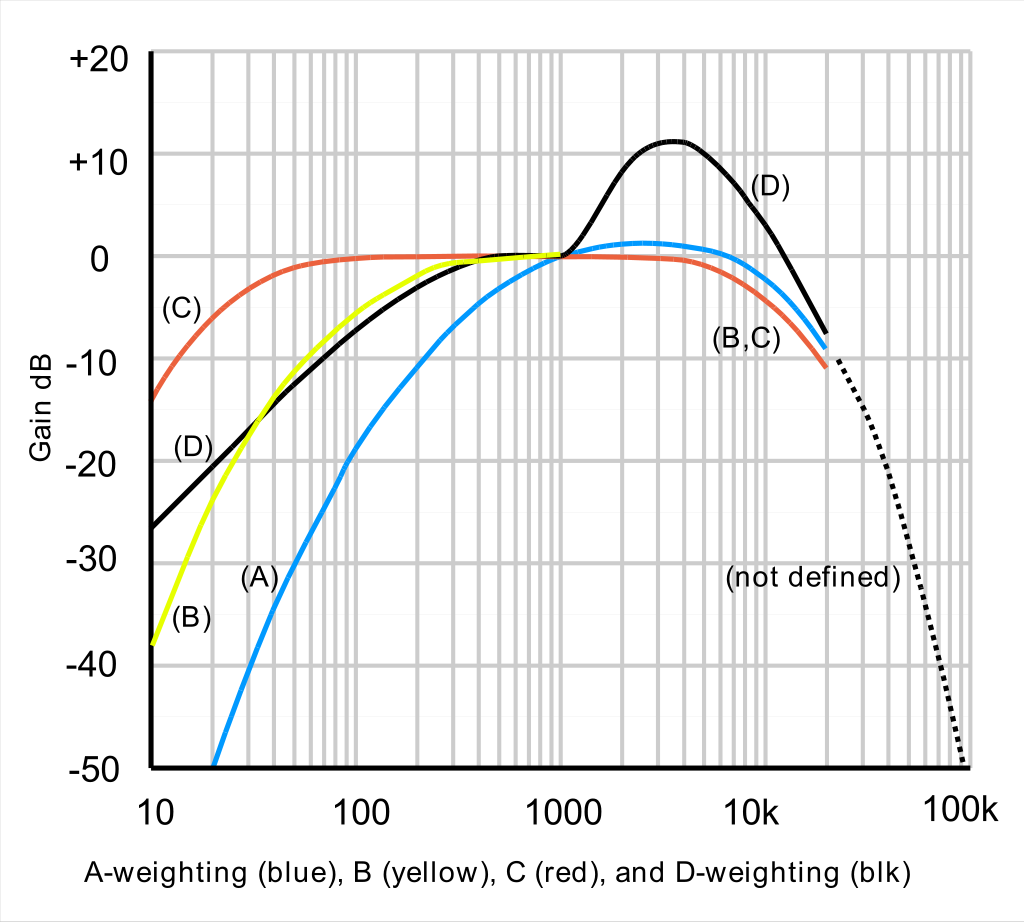
A weighting – Most tailored to the human ear at lower volumes, attenuates low and very high frequencies. Measured loudness will compare well to perceived loudness.
C weighting – Compared to the A weighting filter, this doesn’t attenuate the low-end, created to match the ear at louder levels (100 dB SPL), but it’s not matching 100%
Time weighting:
Fast – 125ms rise and decay time
Slow – 1 Second rise and decay time
Leq: Equivalent continuous sound level, so LAeq60 would be an a weighted average of 60 minutes as an example.
Osha/Niosh : Occupational Safety and Health Administration ( Permissible Exposure Limit at which employers are legally obligated to protect their employees) National Institute for Occupational Safety and Health ( Recommended Exposure Limit )
L10 Is shown in the SPL history section, refers to the loudest 10% of the measurement.
L50 Is shown in the SPL history section, median of the measurement.
L90 Is shown in the SPL history section, the level was above this 90% of the time, generally this is a good reading for background noise levels
Special mention for 1 kHz tone at 94/110 dB: at 1 kHz it doesnt matter wether its A or C weighted as you can see in the image to the right, so its perfect for calibration.
Reference:
Image: https://en.wikipedia.org/wiki/A-weighting
A graph of the A-, B-, C- and D-weightings across the frequency range 10 Hz – 20 kHz
extra: http://www.rationalacoustics.com/download/Smaart-v8.2-Quick-Start.pdf
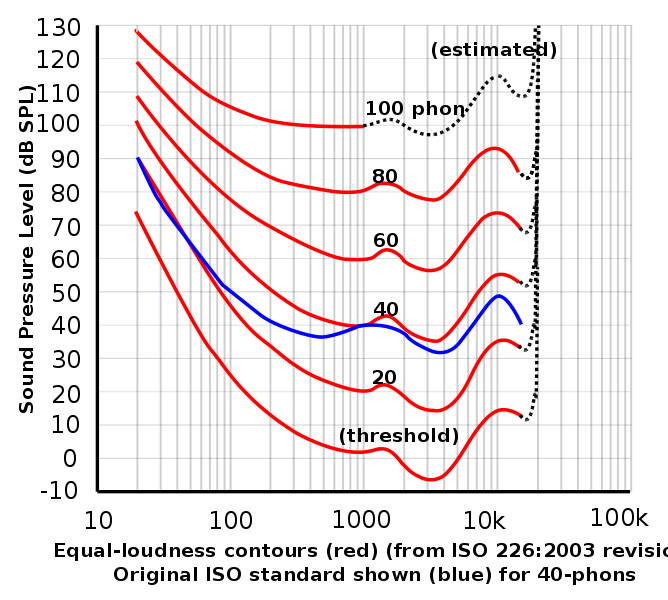
reference: https://en.wikipedia.org/wiki/Equal-loudness_contour
ISO equal-loudness contours with frequency in Hz.
Required gear
You won’t need much more gear than a standard Smaart setup.
Your measurement mic ideally should be able to handle noise up to 140dB+, a good recommendation for this is the Isemcon EMX-7150 for example, which is capable of capturing up to 145dB.
Another worthy mention is the Earthworks S30, capable of handeling 142 dB, Audix TM1 140dB max.
These values may seem high compared to the average concert, but peak levels are way above average levels, having a microphone that is capable of capturing such is essential.
Furthermore you will need to calibrate your microphone within Smaart, because it will need some reference of how loud something is.
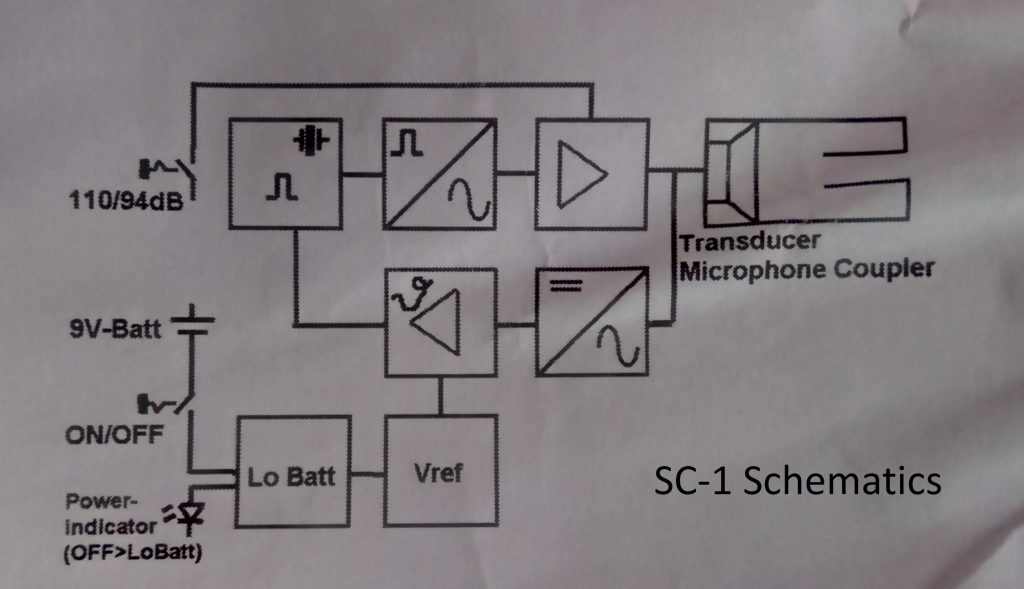
This is done with special calibrators, like the Isemcon SC-1, I know there are others around as well, on amazon etc. but i dont have first hand experience with those, so i will just use the SC-1 as my reference.
A calibrator will output a 1 kHz tone at 94 or 110 dB (selectable), When the SC-1 has checked its battery capacity, and determined that to be enough, it will check and verify its own accuracy and sensitivity, the unit will also compensate for temperature.
Besides a microphone capable of handling high spl and a calibrator, you dont need anything more besides your usual Smaart setup.
Image reference: Isemcon SC-1 manual
Calibration process
This bit is fairly easy, open up smaart and find I-O config in the config menu.
In the I-O config menu you will find a button at the bottom of the configurator screen called ”calibrate”
After you press calibrate, it will open another window, in which you select the Mic channel you wan to calibrate
Put the calibrator (like SC-1) carefully on the microphone, with a signal thats well above 20 dB of the noisefloor present, and hit the button calibrate.
The calibration will run and you can set this level to a dB value such as 94 or 110, and Smaart will create an offset to match that value.
Now you see that your calibrated microphone will have a ”cal. offset” value in the main I-O config screen. That are all the steps to calibrating your microphone within Smaart.
note: allow for enough headroom in smaart to catch the peak levels!
Logging and history
In the configurator screen there is a tab for SPL config, in which you can create a nice grid overview for yourself with tons of information to look at. It supports multi microphone, and warning colours per metric.
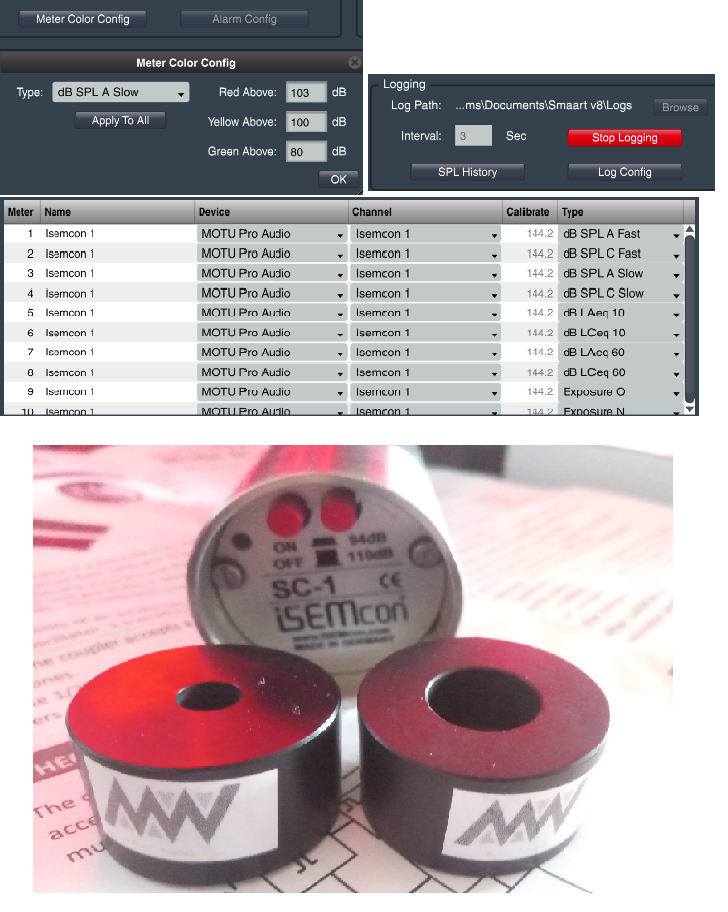
A combination of a few configuration parts in the SPL configuration screen + SC-1 + adapters 
SPL history
Making a report

A report can be made with the press of a button, you can fill in your information and company/venue information, and perhaps a note about where the measurement was taken / house limits.
After you press Okay Smaart will roll out the report for you. (PDF reports are in development)
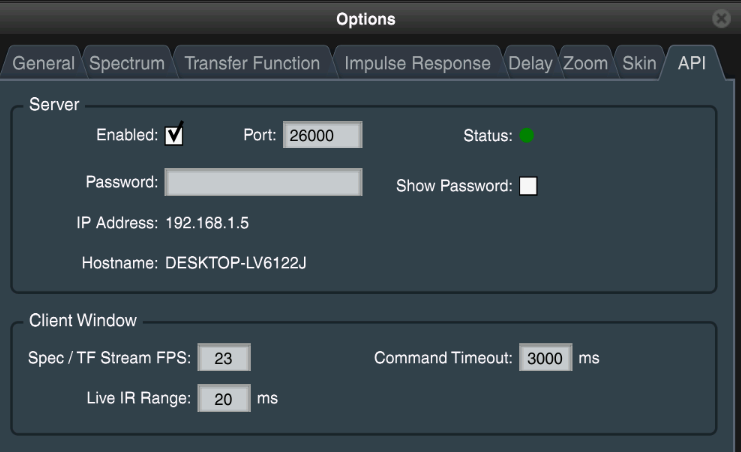
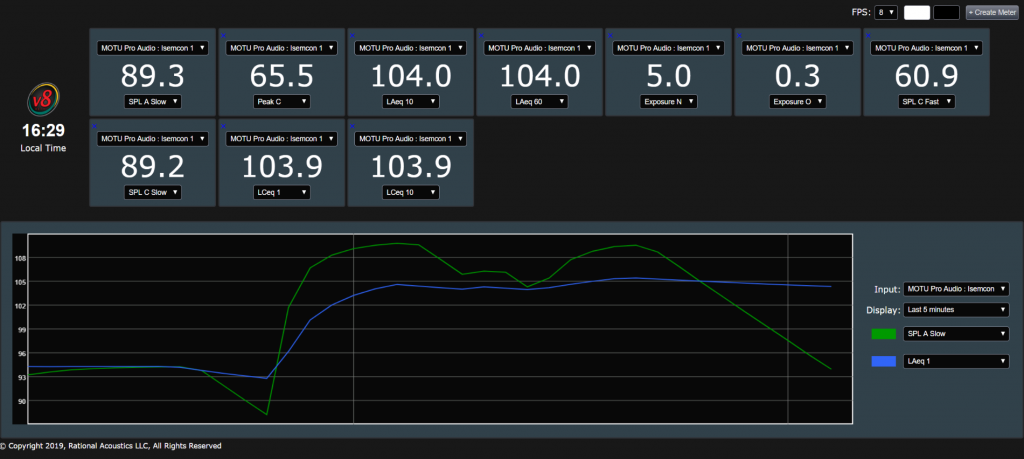
Webserver
You can set up a webserver so that you or someone else can remote view the SPL readouts (all metrics, multiple mics, you can set up a nice grid again).
This is simply done in the Options dropdown menu, select the API… option.
This opens up a little menu with a webserver, you only have to select enabled, and perhaps lock it with a password.
On the host pc you can connect by opening a browser and entering ‘Localhost:portnumber’ and for remote access Smaart will tell you the IP adress (webbrowser: ipadress:port).
The IP Address is obviously either set in the windows settings, or given out by a DHCP server/Static routing in your network, but whatever it is, Smaart will tell you here.
More resources:
http://www.dblimits.com/ for country specific limits, submitted by users
https://store.rationalacoustics.com/smaart.html Smaart licenses, with recently added a specific SPL license
https://www.rationalacoustics.com/download/SmaartSPLQuickStartGuide.pdf